Building Multi-Tiered Cakes
I’m Meg, a friend of Sam’s and novice decorator that has also become addicted to cake decorating. I’ve built a few multi-tiered cakes over the last year or so and each time I’ve learned something new; I think. There are a few tricks to doing it but I’ll go through step by step to give you an idea of how to go about it. Supporting the weight of the tiers is really important, so its good to know a few tricks on how to do it right. The last thing you want is a squashed or saggy cake.
Step One – Deciding on the size:
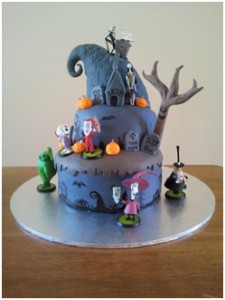
This can be a little tricky. I almost always over-cater. Which is good, because it means there are always leftovers! But some people may prefer to have it all eaten on the day. My decision about the size of my cake usually begins with knowing what design I want to make. That often takes the decision out of my hands! For instance, I wanted to make a ‘Nightmare Before Christmas’ cake that I’d found an image of online. It was two tiers with a rice krispy sculpture on top. From there I had to work out what size I wanted each tier to be. Wilton have a really great chart to give you a basic idea of how many serves you will get out of any size or shape of cake. BUT it’s sometimes dependent on what tins you have access to (though you can get most sizes from Spotlight now for $20-$30). For this one I used an 8” round to make the bottom tier and then a 6” round to make the middle and, as I said, rice krispy treats on top. If I made it again I’d actually use a smaller middle tier because it didn’t leave me much gap around the outside to load on my decorations.
To sum up, when choosing size consider:
- Cake design
- Number of guests to be served
- Tins available
Step Two – Baking:
Once you’ve worked out how big you want your cake to be you’ll need to bake at least 2 cakes per tier, depending on the design. If you’re using a small tin (6” and smaller) you can probably get away with one (if you’re using a recipe which rises), but because the larger tins require more baking to get the middle nice you usually have to use two layers to get a nice height in your tier. Also, make sure that you’re familiar with the recipe you’re using. You’ll need to know baking times, how it rises etc. You’ll also need to make sure that the cake is dense. If you’re building tiers it’s really important that the cake is dense enough that it won’t sag when you begin to put all of the tiers together. Mud cake works really well (in any variety). Finally, once you’re finished baking you need to make sure that you rest the cakes. Ideally, they should be left overnight in the fridge. If you’re going to be carving the cake into a shape the best thing you can do is freeze it.
To sum up, when baking:
- Make 2 cakes per tier
- Choose a familiar recipe
- Rest the cake when complete
Step Three – Building each tier:
When you’re stacking the cakes together into their tiers there are a couple of things I’ve learned. It’s important to have a good filling for your cake, but a quick search on the net will find you a nice filling depending on the flavour of your cake. This then needs to be piped into a dam around the edge of the bottom cake and generously spread over the top of the bottom cake. Then, when you stack the next cake on top you should put it on upside down so that you get a nice finish on top. When they’re stacked together the dam will push out to the sides. Smooth over before moving on. Then, once you’ve stacked the cakes together you can carve and ice the cakes. Ganaché works best. Again, once they have been iced they need to rest, ideally overnight in the fridge. Trust me when I say that I’ve tried this a few times and the 3 day system works best (day 1 – bake, day 2 – ice, day 3 – decorate). When you are stacking the tiers the more you have rested and cooled the cakes the easier it will be to keep them all stable. Once they’re all cooled you can cover them with fondant, which Sam has explained in another post.
To sum up, when icing:
- Find a good filling, and use a dam
- Rest the cakes once iced.
Step Four – Stacking:
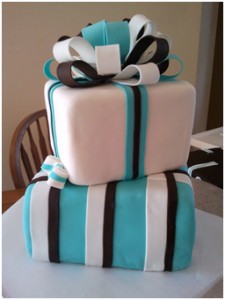
By now you should have your tiers all nicely covered with fondant. If you’re applying any decoration like stripes (see the present cake) then you’ll need to do this before stacking the cakes together. A quick note on timing. The later you can leave the stacking of multi-tiered cakes the better. Particularly three tiered cakes, I’ve found. If you stack them hours and hours ahead of time then they’ll sag. Note the blue tier (below) of the present cake. It has begun to bulge outward. Not a good look. If I’m delivering a cake I actually assemble it once at the venue. So once you have your fondant covered tiers you need to dowel each tier. I use wooden dowels which are easy to find at cake stores and, again, at Spotlight or, even better, in Sam’s online store! You’ll need to measure the height of your tiers and cut the dowels to the right height. They are super easy to cut with a pair of garden shears or wire cutters. Once they are the right height you’ll need to position them in the bottom tier first. The bigger the cake, the more you will need in each tier. For a 10” bottom tier, for example, I use 6-8 dowels. This will stabilise your cake and will make sure that the tiers don’t sink. Once the bottom tier is doweled you can do the same for the other tiers, except for the top tier! It doesn’t need dowels. When doing different flavours in each tier I sometimes use a thin piece of cardboard to separate each one, cut to shape so you can’t see it. Make sure that you centre each tier. If you’re unsure, trace the size of the tier you are placing on some baking paper and work out positioning that way. You can outline the place for the tier using a skewer. Very, very lightly trace around the baking paper template. Then, when placing the tier don’t be afraid to drop. I use my icing spatula to help me drop the cake without getting too many finger marks on my fondant covered cakes!
To sum up, when stacking:
- Dowel each tier
- Cut dowels with garden shears
- Centre each tier
Step Five – Finishing:
Finally, once all your tiers have been stacked you may need to hide the join between tiers. When you fondant the tiers, as long as you’ve folded the fondant under the cake you can almost get away with leaving them like that.
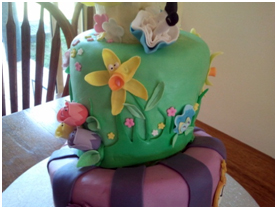
Similar thing was done with the present cake aside from a couple of decorative touches to cover some small issues. The alternative is that you can use small fondant balls placed around the tiers to make them look tidy. To make them even I use my circle cutters and evenly rolled out fondant. Ribbons and bows can hide many a problem! I also used a ‘grass’ edging on an ‘Alicein Wonderland’ cake that I did, which worked really well. Just rolled fondant, cut into the shape to suit the cake.
Hopefully that helps with any troubles or questions you have about stacking muliple tiers.
~Meg Dunstan~


Leave a Reply
Want to join the discussion?Feel free to contribute!